
I Tried the “Pressed Petal Pumpkin” Hack, and It Might Be the Most Aesthetic Halloween Trend Ever
Forget carving — this fall, I’m all about those floral pumpkins.
When I saw this gorgeous Instagram post in which Bonnie Barton (@flashesofstyle) and a group of friends give basic pumpkins the ultimate glow-up, with dried flowers and Mod Podge, I knew I had to try it for myself!
As I had hoped, creating my floral pumpkin was a fun, simple, and mess-free way to upgrade my fall decor. The materials, including the pumpkin, paint, flowers, and Mod Podge, cost me around $20.
I used Barton’s video as a guide and came up with a simple step-by-step to make my pretty floral pumpkin. Just follow the instructions below to turn your pumpkin into the ultimate fall decor piece that’ll make your dorm look seriously Pinterest-worthy! 🍂💐
What You Need
- Small to medium-sized pumpkin (real or faux)
- Mod Podge
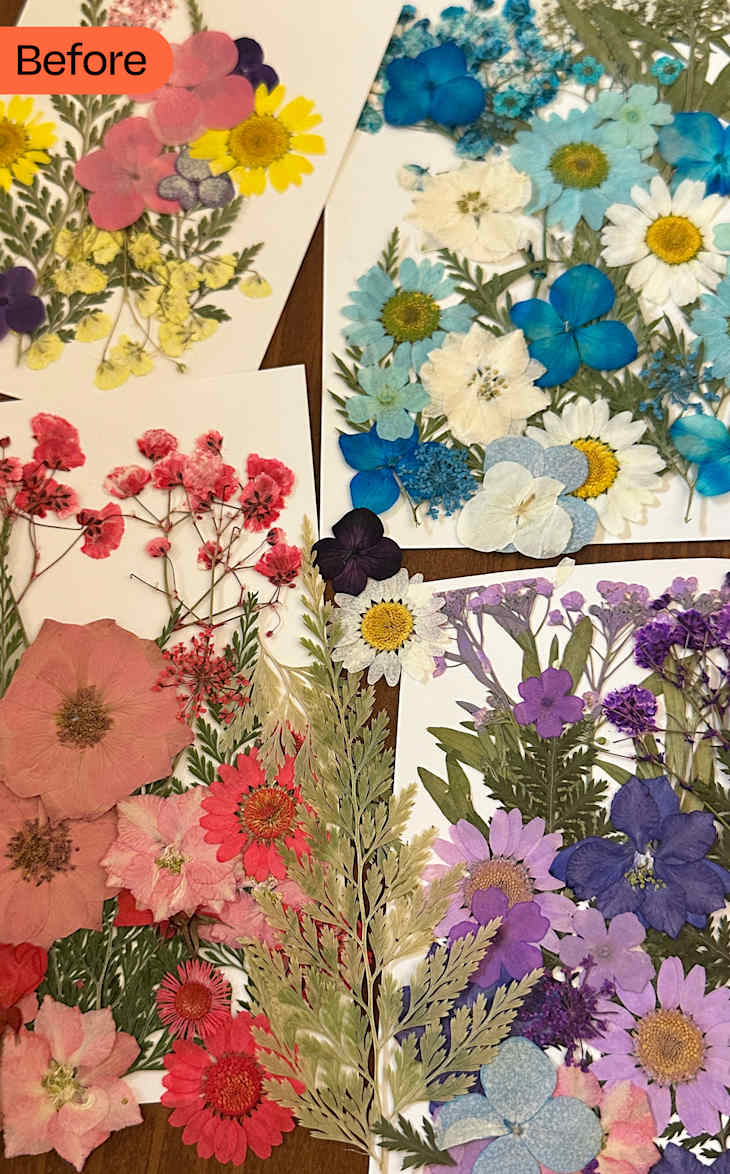
- Dried, pressed flowers
- A sponge brush
- Acrylic paint and a paintbrush (optional)
How to Make a Floral Pumpkin
- Prep your pumpkin. Grab a pumpkin with a smooth surface. I chose to go with a real one. Give it a quick wipe if yours is real, too, just to make sure it’s clean.

2. Paint your pumpkin. If you want to add an extra layer of flair, paint your pumpkin in a color that complements your floral arrangement. I chose pale pink. You might also stick to a color palette that vibes with your room decor, or you could go bold with deep autumnal shades like burgundy and mustard yellow. Let the paint dry completely before moving on to the next step.

3. Apply Mod Podge. Use the sponge brush to add an even layer of Mod Podge to the pumpkin where you want to place your flowers.

4. Arrange the flowers. Press the flowers firmly onto the surface of your pumpkin. Hold for a few seconds to ensure they stick well. If there are any gaps, fill them with smaller flowers or greenery. For an extra creative touch, add textures like dried leaves. You can also apply Mod Podge on top of the flower edges to give them a polished, seamless look.

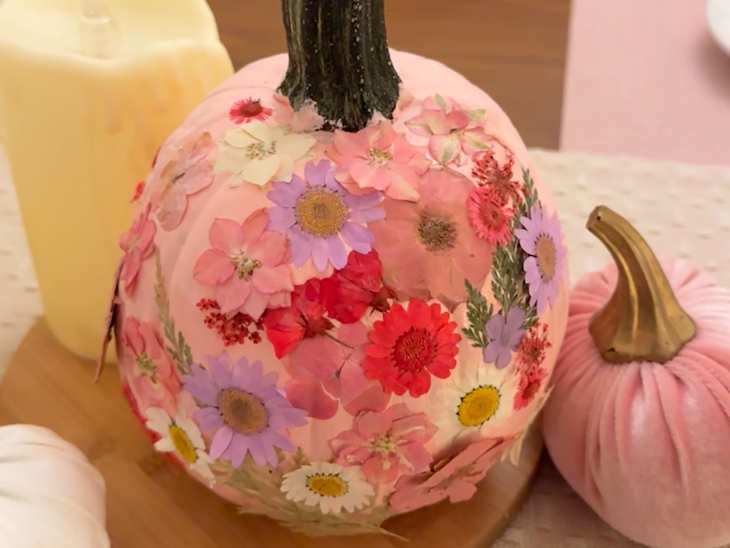
The Result
Honestly, I thought this would be a more complicated project than it turned out to be, and my floral pumpkin turned out way better than I expected! You do not have to be a crafty person to do this DIY. I love crafting, and this project was super easy to tackle.
Next time, I won’t use as much Mod Podge — I overestimated how sticky it is!
But overall, my floral pumpkin project was such an enjoyable way to add a personal touch and fall vibes to my dorm. And I got to combine two things I love — flowers and fall — to put a super fun twist on the usual pumpkin decor.
